Return to top of page
Justis 5 Technical FAQs – Installation and Setup
Here you will find answers to technical queries affecting the Justis 5 software on stand-alone or networked computers.
If your question is not answered on this page, there are several other pages of FAQs listed on the left of your screen.
- Q – What hardware equipment and software do I need to run Justis 5?
- Q – How much hard disk space is taken up when the Justis 5 software is installed?
- Q – I have completed a Network Server installation and am running Windows locally on each Workstation - do I have to go to each of my 200 Workstations to set them up individually?
- Q – Can I personalise the list of CD-ROMs/databases in the Select Database(s) dialog box?
- Q – Can I customise Justis 5?
- Q – How do I create a J-Link shortcut?
Q – What hardware equipment and software do I need to run JUSTIS?
A – The minimum hardware requirements for Justis 5 software are:
|
Processor RAM Hard Disk CD-ROM Drive Operating System |
Pentium P100 16 MB RAM 75 MB free space Double speed Windows 95 or Windows NT 4 |
However for better performance we recommend the following:
|
Processor RAM Hard Disk CD-ROM Drive Operating System |
Pentium II P300 or faster 128 MB RAM 100 MB free space Quad speed or faster Windows 2000 or Windows XP |
The current release of Justis 5 software is version 5.31.
Q – How much hard disk space is taken up when the Justis 5 software is installed?
A – Complete: 13743k, Network: 29296k, Workstation: 7836k.
Q – I have Windows 3.11, can I run Justis 5?
A – Justis 5 is a true 32-bit application, but versions up to and including 5.21 support Windows 3.1x platforms through Win32s. However, some features are disabled, and this is the last release that can run under Windows 3.1x. The minimum requirement for RAM is 16MB, with a recommendation of 32MB. Help Desk support for users running Justis 5 under Windows 3.1x was withdrawn from the end of September 1999.
Q – Can I personalise the list of CD-ROMs/databases in the Select Database(s) dialog box?
A – If you have not personalised the list of CD-ROMs/databases to which you subscribe, and you choose a CD-ROM you do not subscribe to from the list, the software will search all local and network drives for the product and come back with the Database Manager dialog box stating it cannot find the CD-ROM.
There is the facility to personalise this list to indicate (by a tick) which of the CD-ROMs in the list you subscribe to. If you then choose a product which is not marked with a tick, it will come back immediately with a message to say it is not available. To do this, open Justis 5 and click the Tools menu, click Preferences and then select the Databases tab. This is especially useful in a large organisation where the users may not know which products the organisation subscribes to.
In a network installation it is possible to set this in the server copy by using the NOptions feature on the Network Setup diskette supplied with network copies of Justis 5.
A – There are several features and functions of the Justis 5 software that can be controlled and customised by you, the user. This enables:
- system administrators to control Justis databases in a networked environment
- end users to control the operation of the software
- end users to set personal preferences.
Select Tools from the menu bar, and click Preferences.
Three tabs are displayed: User, Admin and Databases. Between them they offer the following preferences:
Enabling/Disabling Links
If you have a product that refers to another database to which you do not subscribe, you may wish to disable the links to that product.
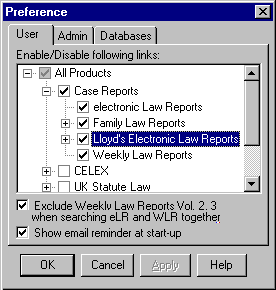
E-mail Reminder
Justis 5 includes a facility for us to send messages to Online users. These may be Online announcements or useful information about the databases you are using. When you log on you will be alerted that a message exists. Using preferences you can turn this feature off so that you have to actively select new messages. We would, however, advise against this as you may miss an important announcement.
Export Directory
Use this to determine the directory destination for exported documents, such as the A: drive. The systems administrator can password protect this preference.
Download Limit
A limit on the number of documents exported in any one session can be set. The default is 50 documents, and any limit can be set between 1 and 500. This is also password protected.
Disabling Notes & Highlighting
In an environment where one stand-alone computer is being used by many it may not be convenient to have notes and highlighting added and viewed by different users. This password protected preference can prevent notes and highlighting from being added.
Customisable Menu
The systems administrator can mark the databases to which you subscribe. These will be indicated by a tick in the Select Database(s) dialog box. Those not ticked will not be selectable, preventing the software from trying to find the CD-ROM(s) on the network.
Q – How do I create a J-Link shortcut?
A – The Setup program creates an icon for J-Link in the Context group on the Programs menu off the Start button. If you are using Windows 95, Windows 98, Windows ME, Windows NT or Windows 2000, you can create a shortcut icon on your Windows desktop for J-Link:
- Double-click the My Computer icon on your desktop.
- Double-click the icon for the drive where you installed Justis 5 (for example C: or a network drive).
- Double-click the icon for the Context directory (or wherever you installed Justis 5).
- Double-click the icon for the Justis subdirectory (on a local hard disk) or Justserv subdirectory (on a server).
- Double-click the icon for the Bin subdirectory.
- Point to the icon for the Fddl.exe file, hold down your left mouse button, drag to a clear area of your Windows desktop, and release the mouse button.
- Locate the new shortcut icon on your desktop and click it with your right mouse button.
- On the pop-up menu that appears, click Rename.
- Type "J-Link" (without the quotes) and press Enter on your keyboard.
You will now have a convenient shortcut icon for J-Link on your Windows desktop.
4th October 2006